Creating a Validation Mode in VIBE#
There are a few things to note about any new mode that is added to VIBE:
Indexing by group
When adding a new mode to VIBE you must place it in the correct directory.
Firstly all validation modes must be added to the vibe.analysis_validation_modes directory.
Inside analysis_validation_modes you can find a number of subdirectories for different groups like so (dated Jun 30, 2026):
$ ls vibe/analysis_validation_modes
example  physics   tracking
Most analysis validation modes will reside in physics.
However, if you have a specific group that is distinct from the ones already listed, open an issue in VIBE detailing what working group you need added and the one of the maintainers will assist with adding that group.
Naming the python file
The naming convention for the python file is straight forward and can be altered later if needed.
All modes should have their names starting with the name of the python class inside the .py file followed by any additional identifying information.
For this example I will choose to place my file in the vibe.analysis_validation_modes.example group subdirectory and name it like so:
$ touch vibe/analysis_validation_modes/example/doc_example_validation_mode.py
And just like that we have created the python file that will contain our new mode!
Validation Mode Template#
A Mode in VIBE is defined within a python class that inherits from ValidationModeBaseClass.
It must contain two methods and you have to set the name, if not defined VIBE will not run like intended.
Below is an example mode containing the two required methods:
# vibe/analysis_validation_modes/example/doc_example_validation_mode.py
import basf2

from typing import List

from vibe.core.utils.misc import fancy_validation_mode_header
from vibe.core.validation_mode import ValidationModeBaseClass
from vibe.core.helper.histogram_tools import HistVariable, Histogram, HistComponent

__all__ = [
    "DocsExampleValidationMode"
]

@fancy_validation_mode_header
class DocsExampleValidationMode(ValidationModeBaseClass):
    name = 'docExampleMode'

    def create_basf2_path(self) -> basf2.Path:
        path = basf2.Path()
        ...
        return path

    @property
    def analysis_validation_histograms(self) -> List[Histogram]:
        ...
        return [hist1, hist2,...]
The
namemust be unique from any other names defined in any other modes. This unique name is used to identify the mode that is currently running throughout VIBE.The
create_basf2_pathmethod is where you will add all your basf2 specific code and build your analysis path which is returned by the method.The
analysis_validation_histogramsproperty defines the variables that are plotted by VIBE. This is done by creating a list ofHistogramobjects defined specifically for your mode.
Note
Note that the class is decorated by the fancy_validation_mode_header, this is for documentation purposes and is necessary for every new mode.
Additionally, to make sure that your mode is correctly added to the documentation, you must add the class to the __all__ list on top of the file.
The basf2 Path#
The production of the n-tuples is controlled via the create_basf2_path method, which has to return a valid basf2 path.
Here the user can define a common basf2 steering path with n-tuples written at the end.
It is possible to write out the content of multiple particle lists, which are then saved in different trees in the output file.
Warning
Within the basf2 path the user must not use the common variablesToNtuple function provided in the modularAnalysis package.
Instead use the custom variables_to_validation_ntuple() wrapper function provided by the framework has to be used:
# vibe/analysis_validation_modes/example/doc_example_validation_mode.py

def create_basf2_path(self) -> basf2.Path:
  path = basf2.Path()
  ...
  self.variables_to_validation_ntuple(
      decay_str="docExample",
      variables = ['list', 'of', 'variables'],
      path = path
  )
  return path
Warning
b2luigi pickles the basf2 path before sending the project to the grid, so you have to make sure that the provided basf2 path is picklable. Nevertheless aliases are supported. The pickleability of the basf2 path is checked by the unit tests. In case your validation mode relies on a basf2 path that is not picklable, please open an issue.
Let us expand our DocsExampleValidationMode template to include a working basf2 path:
# vibe/analysis_validation_modes/example/doc_example_validation_mode.py

import basf2
import modularAnalysis as ma
from typing import List

from vibe.core.validation_mode import ValidationModeBaseClass
from vibe.core.helper.histogram_tools import HistVariable, Histogram, HistComponent

__all__ = [
   "DocsExampleMode"
]

class DocsExampleValidationMode(ValidationModeBaseClass):
   name = 'docExampleMode'

   def create_basf2_path(self) -> basf2.Path:
       path = basf2.Path()

       ma.fillParticleList(...)
       ma.reconstructDecay(
           decayString="B0:sl_rec -> pi-:rec mu+:rec",
           cut = "",
           path=path
       )

       self.variables_to_validation_ntuple(
           decay_str="B0:sl_rec",
           variables = ["weMbc(m1,0)", "isSignal",...],
           path = path
       )
       return path

   @property
   def analysis_validation_histograms(self) -> List[Histogram]:
       ...
       return [hist1, hist2,...]
After defining our path our path manipulation can be as complex as necessary so long as the resultant path can be pickled!
Lastly we write out our n-tuples using self.variables_to_valudation_ntuple as discussed before.
And with that our basf2 path is complete!
Note
Note we don’t have to worry about loading input mdst or defining output paths. VIBE handles all that in the background for you.
More Complicated Paths#
Sometimes it might be necessary to run slightly different basf2 paths dependent on the input dataset.
For example we might to run the same validation mode on mdst and on raw data.
In the latter case we would need to run the reconstruction in addition which was already run for the mdst case.
Such behaviour can be achieved by adding additional kwargs to the create_basf2_path method.
In our example this would look like this
# vibe/analysis_validation_modes/example/doc_example_validation_mode.py

def create_basf2_path(self, run_reconstruction = False) -> basf2.Path:
    path = basf2.Path()

    if run_reconstruction:
        add_reconstruction(path=path)

    ma.fillParticleList(...)
    ma.reconstructDecay(
       decayString="B0:sl_rec -> pi-:rec mu+:rec",
       cut = "",
       path=path
    )

    self.variables_to_validation_ntuple(
       decay_str="B0:sl_rec",
       variables = ["weMbc(m1,0)", "isSignal",...],
       path = path
    )
    return path
We can control these kwargs per dataset in the mode config toml file.
Warning
To make the unitests succeed, every kwarg in the create_basf2_path method needs a default value to be set! This is also useful to not necessarily having to specify the kwarg for all datasets in the config.
The Histogram List#
Plotting in VIBE is controlled by a list of Histogram objects that has to be provided in your mode class.
Each Histogram is defined with several parameters:
name: A name for the histogram which is used in the filename. This has to be unique within a class.title: A title that is written on top of the histogram.hist_variable: AHistVariableobject that contains information about what is plotted, e.g. the variable to plot, the binning, …hist_components: A list of components in the plot which are defined asHistComponentobjects.particle_list: The particle list for which the histogram should be created. If your steering script writes n-tuples only for one list, this does not have to be defined.
For example:
# vibe/analysis_validation_modes/example/doc_example_validation_mode.py

from vibe.core.helper.histogram_tools import HistVariable, Histogram, HistComponent

@property
def analysis_validation_histograms(self) -> List[Histogram]:
   return [
       Histogram(
           name='Mbc',
           title=r"$B \rightarrow \pi \ell \nu$",
           hist_variable = HistVariable(
                   df_label=makeROOTCompatible(variable='weMbc(m1,m0)'),
                   label = r"$M_{bc}$ (cleaned ROE)",
                   unit = r"GeV/$c^2",
                   bins = 50,
                   scope = (5.24, 5.29)
           ),
           hist_components = [
               HistComponent(
                   label='All'
               )
           ],
       )
   ]
The output of this plot is shown below.
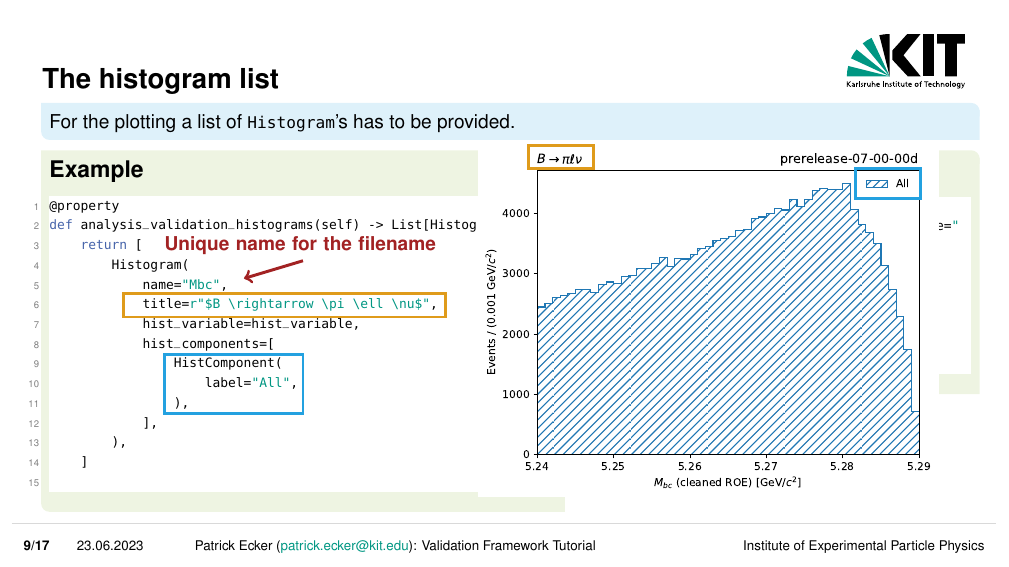
Which is super neat!
All that information was rendered nicely to a histogram as intended.
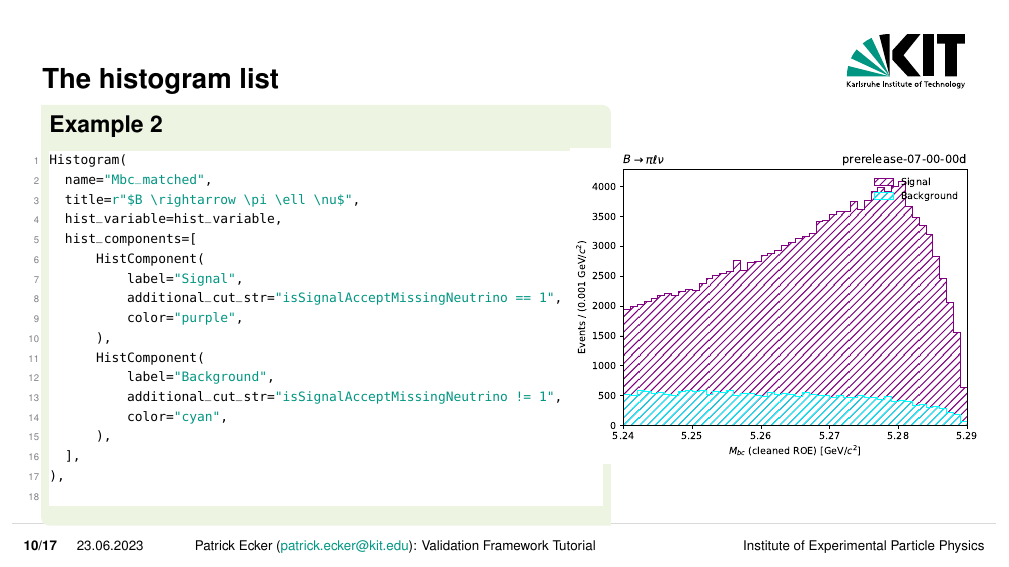
We can go one step further though, if say we wish to have multiple components overlaid on a single histogram this is also possible in VIBE.
We can add multiple HistComponents to the list of hist_components in our Histogram.
# vibe/analysis_validation_modes/example/doc_example_validation_mode.py

from vibe.core.helper.histogram_tools import HistVariable, Histogram, HistComponent

@property
def analysis_validation_histograms(self) -> List[Histogram]:
 return [
     Histogram(
         name='Mbc',
         title=r"$B \rightarrow \pi \ell \nu$",
         hist_variable = HistVariable(
                 df_label=makeROOTCompatible(variable='weMbc(m1,m0)'),
                 label = r"$M_{bc}$ (cleaned ROE)",
                 unit = r"GeV/$c^2",
                 bins = 50,
                 scope = (5.24, 5.29)
         ),
         hist_components = [
             HistComponent(
                 label='All'
             )
         ],
     ),
     Histogram(
         name='Mbc_matched',
         title=r"$B \rightarrow \pi \ell \nu$",
         hist_variable = HistVariable(
                 df_label=makeROOTCompatible(variable='weMbc(m1,m0)'),
                 label = r"$M_{bc}$ (cleaned ROE)",
                 unit = r"GeV/$c^2",
                 bins = 50,
                 scope = (5.24, 5.29)
         ),
         hist_components = [
             HistComponent(
                 label='Signal',
                 additional_cut_str='isSignalAcceptMissingNeutrino == 1',
                 color = 'purple'
             ),
             HistComponent(
                 label='Background',
                 additional_cut_str='isSignalAcceptMissingNeutrino == 0',
                 color = 'cyan'
             ),
         ],
     )
 ]
Again we can see how our components were rendered to the additional histogram.
Note
The special case to plot multiple variables in one plot is also supported in VIBE.
This is for example useful if one wants to compare a corrected and uncorrected momentum distribution.
The feature can be enabled by explicitly setting the variable in the HistComponent.
Efficiency Calculation (optional)#
If an efficiency should be calculated for each dataset, the get_number_of_signal_for_efficiency method should be implemented into your mode class.
This method has to implement the logic to return the number of signal events using panda’s dataframes.
VIBE then automatically calculates the efficiency using the correct number of produced events.
In case more than one particle list is written to the ntuples by the mode, one can use the particle_list parameter to steer how the efficiency is calculated per particle list.
For example
# vibe/analysis_validation_modes/example/doc_example_validation_mode.py

import pandas as pd

def get_number_of_signal_for_efficiency(self, df : pd.DataFrame, particle_list: Optional[str] = None) -> float:
    if particle_list == "B+:sig":
        return df['isSignalAcceptMissingNeutrino'].sum()
    else:
        return df['isSignal'].sum()
Offline Cuts (optional)#
If you want to manipulate the panda’s dataframe offline (e.g apply cuts, add columns, etc.) you can do this via implementing the offline_df_manipulation method
# vibe/analysis_validation_modes/example/doc_example_validation_mode.py

import pandas as pd

def offline_df_manipulation(self, df : pd.DataFrame) -> pd.DataFrame:
    df = df.sample(frac=1.0).groupby(by=["__event__"]).head(1) # applying random BCS offline
    return df
Warning
Whatever is applied here is applied to any plot or efficiency calculation.
In the workflow, the .root files in the merged output directory are opened and the data manipulation is processed.
The standard output of this data manipulation is a .parquet file (https://parquet.apache.org/) saved in the offline_processing directory.
This parquet file is used for the plotting and efficiency calculation section of VIBE.
If you require that the manipulated data is also saved as another valid output type for other validation purposes outside of VIBE, this can be achieved by using the @add_output_formats decorator:
# vibe/analysis_validation_modes/example/doc_example_validation_mode.py

import basf2
import modularAnalysis as ma
from typing import List

from vibe.core.validation_mode import ValidationModeBaseClass, add_output_formats
from vibe.core.helper.histogram_tools import HistVariable, Histogram, HistComponent

__all__ = [
   "DocsExampleMode"
]

class DocsExampleValidationMode(ValidationModeBaseClass):
   name = 'docExampleMode'

   # -- other methods of our VIBE mode
    @add_output_formats('root')
    def offline_df_manipulation(self, df : pd.DataFrame) -> pd.DataFrame:
      df = df.sample(frac=1.0).groupby(by=["__event__"]).head(1) # applying random BCS offline
      return df
In this example VIBE will also run a task (in parallel to the parquet task) that creates a .root file with the changes made in offline_df_manipulation.
Note
There is no need to specify the "parquet" file in the decorator as this is by default always created.
Available Output Formats
parquet
root
If there is another format you wish to have your output data in, please open an issue and we can add this to VIBE and it can be toggled using the decorator.
And there we have it, our basic validation mode in VIBE along with all the bells and whistles you can add to it. To define which datasets your mode should run on you can proceed with Mode Configuration.
Plotting Strategies (optional)#
There are two ways to override the default plotting strategies for a mode (see Plotting for an introduction to plotting).
The first is to override the plotting_strategies property in the validation class of the mode.
# vibe/analysis_validation_modes/example/doc_example_validation_mode.py

@property
def plotting_strategies(self):
    return ["custom_strategy_1", "custom_strategy_2"]
This method should be used to define the plotting strategies that are usually used for the mode and are not expected to change often. The second option is to define the plotting strategies in the mode configuration file that is described in Mode Configuration.
# vibe/analysis_validation_modes/example/doc_example_validation_mode.toml

[plotting_config]
    strategies = ["custom_strategy_1", "custom_strategy_2"]
This is especially useful to override the default plotting strategies for a mode at runtime, for example don’t produce data/MC comparisons if no data input dataset is available.